I’ve been learning a lot about TVM this week and I visited the TVM website. I also read a lot of tutorials and code. I found it very interesting. It just so happens that I have Raspberry Pie 3b, so I tried the tutorial code on my ubuntu computer and it worked perfectly.
What is TVM
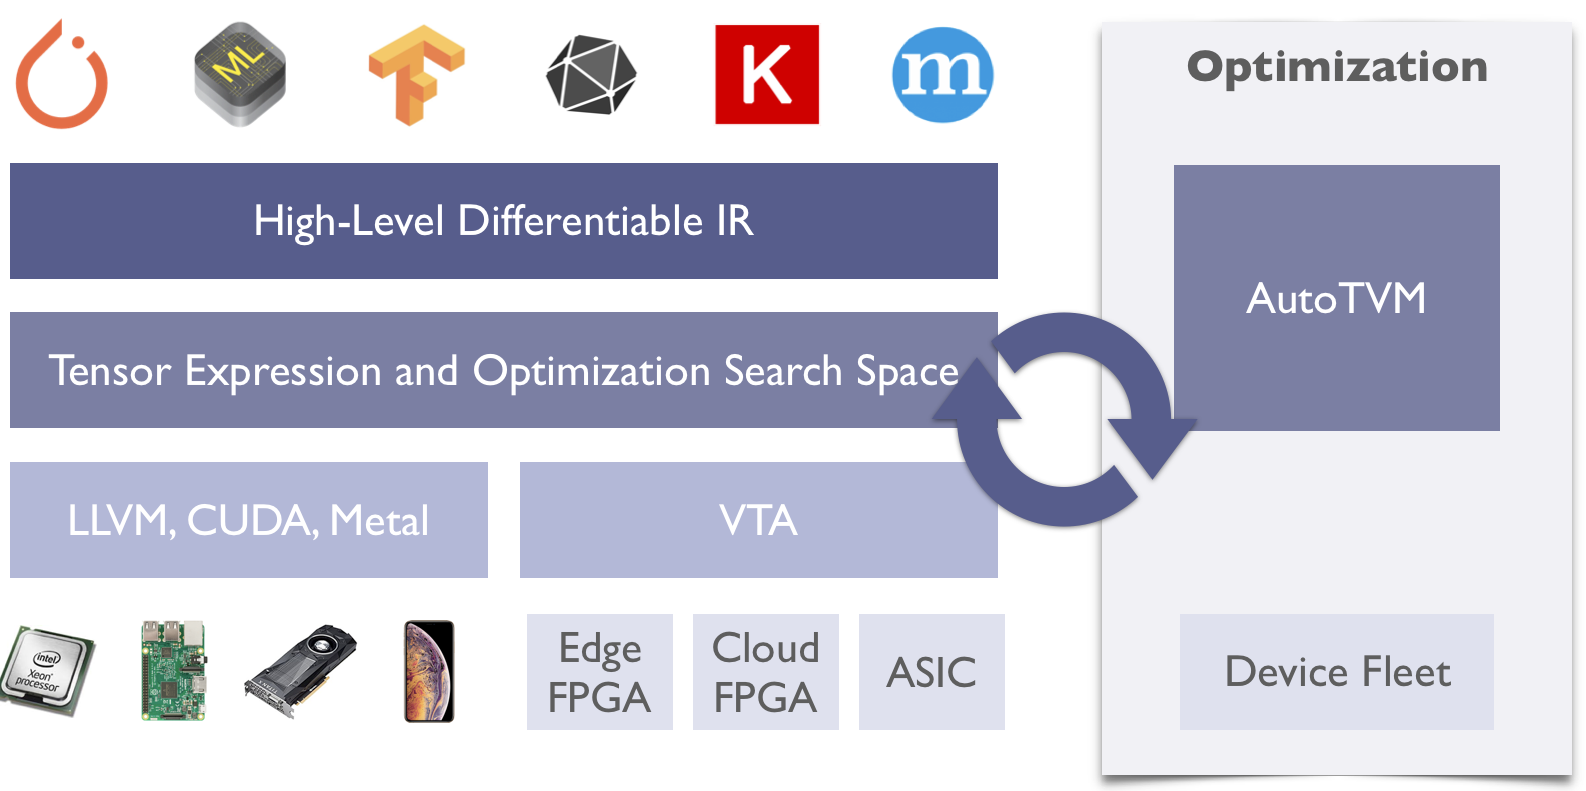
Apache(incubating) TVM is an open deep learning compiler stack for CPUs, GPUs, and specialized accelerators. It aims to close the gap between the productivity-focused deep learning frameworks, and the performance- or efficiency-oriented hardware backends. TVM provides the following main features:
- Compilation of deep learning models in Keras, MXNet, PyTorch, Tensorflow, CoreML, DarkNet into minimum deployable modules on diverse hardware backends.
- Infrastructure to automatic generate and optimize tensor operators on more backend with better performance.
Install TVM on Ubuntu
Reference article: Docs » Installation » Install from Source
I have Ubuntu 18.04.2 LTS on my PC.
- Get Source from Github
1 | git clone --recursive https://github.com/apache/incubator-tvm tvm |
- Build the Shared Library
1 | sudo apt-get update |
- Use cmake to build the library
- copy the cmake/config.cmake to the directory
1
2mkdir build
cp cmake/config.cmake build - Edit
build/config.cmaketo customize the compilation options
Because i have no NVIDA GPU on my pc,so don’t need to setUSE_CUDA ON1
2
3
4set(USE_GRAPH_RUNTIME ON)
set(USE_GRAPH_RUNTIME_DEBUG ON)
set(USE_LLVM ON)
set(USE_VTA_FSIM ON) # enable VTA Simulator
- copy the cmake/config.cmake to the directory
- Build tvm and related libraries.
1
2
3cd build
cmake ..
make -j4 - Set the environment variable for Python
1 | export TVM_HOME=~/tvm |
- To update the environment variables, execute
source ~/.bashrc.
configuration my Raspberry pi
My raspberry pi model is Raspberry Pi 3 Model B Rev 1.2.
Setup my Raspberry pi 3b
- Prepare Raspberry pi 3 and an 8GB TF. and download Raspberry Pi OS, i choiced
Raspberry Pi OS (32-bit) with desktop. - Formatting TF ,write Pi images to TF using
Win32DiskImager. - No display start-up method
- Create a new empty
sshfile in the memory card boot disk, in order to turn on the ssh function. - Create a new
wpa_supplicant.conftext file in the memory card boot disk, write wifi configuration.
1
2
3
4
5
6
7
8
9
10country=DE
ctrl_interface=DIR=/var/run/wpa_supplicant GROUP=netdev
update_config=1
network={
ssid="my wifi name"
psk="my wifi password"
key_mgmt=WPA-PSK
priority=1
} - Create a new empty
- Find the IP adress of your respberry pi in rounter. contect your resperry pi via
ssh1
ssh pi@<ip adress> # password: raspberry
- Use VNC to connect raspberry pi. Command
sudo raspi-configto configuration.
Install TVM on Raspberry pi
- We only need to build tvm runtime on the remote device.
1 | cd ~ |
- set environment varibles in
~/.bashrcfile.
1 | export PYTHONPATH=$PYTHONPATH:~/tvm/python |
- To update the environment variables, execute
source ~/.bashrc.
Environment Building
Ubuntu
- LLVM set environment varibles
1
2
3
4
5
6cd ~
wget https://github.com/llvm/llvm-project/releases/download/llvmorg-10.0.0/clang+llvm-10.0.0-x86_64-linux-gnu-ubuntu-18.04.tar.xz
tar -xvf clang+llvm-10.0.0-armv7a-linux-gnueabihf.tar.xz
rm clang+llvm-10.0.0-armv7a-linux-gnueabihf.tar.xz
mv clang+llvm-10.0.0-armv7a-linux-gnueabihf clang_9.0.0
sudo mv clang_10.0.0 /usr/local~/.bashrc 1
2export PATH=/usr/local/clang_10.0.0/bin:$PATH
export LD_LIBRARY_PATH=/usr/local/clang_10.0.0/lib:$LD_LIBRARY_PATH - Cross Compiler
we need/usr/bin/arm-linux-gnueabihf-g++1
2sudo apt-get install g++-arm-linux-gnueabihf
/usr/bin/arm-linux-gnueabihf-g++ -v
python
- Pytorch
1
sudo pip3 install torch torchvision
- onnx
pytorch->onnx->tvm1
pip3 install onnx
- python-opencv
1
2pip3 install opencv-python
pip3 install opencv-contrib-python
other tool
- Neron
- CUDA (i dont use it.because i have no NVIDA GPU)
- opencv
- download zip source form https://github.com/opencv/opencv/releases
- install contri
1
2
3sudo apt-get install build-essential
sudo apt-get install cmake git libgtk2.0-dev pkg-config libavcodec-dev libavformat-dev libswscale-dev
sudo apt-get install python-dev python-numpy libtbb2 libtbb-dev libjpeg-dev lib- cmake
1
2
3
4
5
6
cd ~/opencv-3.4.3
mkdir build
cd build
cmake -D CMAKE_BUILD_TYPE=Release -D CMAKE_INSTALL_PREFIX=/usr/local ..
make -j7
sudo make install
Deploy model on raspberry pi
Reference :Deploy the Pretrained Model on Raspberry Pi
I run this tutorials code on Ubuntu
- Connect Raspberry pi via ssh
1
ssh pi@192.168.2.105
- Start an RPC server on Raspberry pi
1
2python3 -m tvm.exec.rpc_server --host 0.0.0.0 --port=9090
INFO:RPCServer:bind to 0.0.0.0:9090 # RPC server started successfully - Run code on Unbuntu
1
python3 python3 deploy_model_on_rasp.py
- result
- Raspberry pi
1
2
3INFO:RPCServer:connection from ('192.168.2.108', 57062)
INFO:RPCServer:load_module /tmp/tmppv_8msd5/net.tar
INFO:RPCServer:Finish serving ('192.168.2.108', 57062)- Ubuntu


Model : MXNetresnet18_v1
Run model on raspberry pi via RPC 1
2
3
4
5Time for model loading is 281.33s
Time for build graph is 1.09s
Time for model running is 1.33s
x TVM prediction top-1: tiger cat
y TVM prediction top-1: airlinerRun model on local pc 1
2
3
4
5Time for model loading is 0.90s
Time for bulid graph is 0.03s
Time for model running is 0.10s
x TVM prediction top-1: tiger cat
y TVM prediction top-1: airliner
Running model on Raspberry Pi is significantly slower than running it on Ubuntu, mainly because it is too slow to load model through RPC. But it works.
Deploy model on raspberry pi through LLVM, deploy model on FPGA through VTA.
Reference
- Apache (incubating) TVM An End to End Deep Learning Compiler Stack
- VTA: 开源AI芯片栈
- VTA:一个开放、高度可定制化的深度学习加速器平台
- 菜鸟驿站 - Docker 教程
- Docker —— 从入门到实践
- 一步一步解读神经网络编译器TVM(一)——一个简单的例子
- 一步一步解读神经网络编译器TVM(二)——利用TVM完成C++端的部署
- 树莓派入门(一) - 下载安装系统镜像,Raspbian和Centos
- Raspberry Pi - Install Clang 9 and compile C++17 and C++20 programs